So, here is the story of my $60 music server.
Kind of a diary/guide to save other linux newbies some of the pain I went through. I decided to build a dedicated music server to store my songs, and to run slimserver on. It will live in my garage, and I will turn it on and off as needed. It will be “headless”, no monitor, keyboard or mouse.
Hardware
OK, it was only $60 because I had bits and pieces of stuff around, including a mid tower case, with a generic power supply. I also have some hard drives I have bought on sale at different times. Also had some RAM, left over from when I upgraded my current home PC.
What I needed was a MB and Processor. So, I did some research at the slim devices forums, and at silentpcreview. Looking for something cheap, low power, with enough horsepower to run as a file server and slimserver.I decided on this via based system http://www.newegg.com/product/product.asp?item=N82E16813185043
It is cheap enough, and I think it will do what I need it to do. It also has two Ram slots, two PCI slots and supported USB 2.0. The VIA boards I saw, were more expensive, and did not have all of this. They either had one ram slot, or were USB 1.1, or $100 more expensive.
OS (Linux)
For my OS, since I wanted to run headless, and do not know linux so I looked for something easy. At the slim devices forums, I found this
http://www.clarkconnect.com/
It is free for the “community edition” of clarkconnect. Linux based, but has a GUI interface. Lots of support from web pages and forums, and people are already running slimserver on it. Plus, you can control it remotely, from another PC, so it is ideal for a headless server.
From the clarkconnect site, download the community edition ISO file from here
http://www.clarkconnect.com/downloads/isos.php
You need to burn it to CD as a bootable CD. There are free utilities to do this, google for burning a ISO CD to find one. I used this one
http://isorecorder.alexfeinman.com/isorecorder.htm
Building the PC
So, first I put together the PC. I had an extra mid tower case, with PS, that I used. I also had a 512 and a 256 meg stick of DDR RAM to use. The 512 stick was a higher speed than manfacturer (Chips) calls for the the motherboard, but it worked fine. Normally, it is fine to go with faster RAM.
Since the processor is already installed, it is pretty easy to put this together. Just hook up the Power Supply (you only need a PS with a 20 pin connector), install the RAM, and connect the jumpers from the front of the PC for the LED’s, power switch, ETC. Also, connected two internal USB ports to the front of my case.
At this point, I just installed a small hard drive, and a CD rom drive, on the same IDE port. HD was master, CD slave, both were set to Cable Select (CS). Hooked up monitor, KB and mouse, and it worked .
Then, I went into the BIOS setup, and found the page with the boot drive order. I set the CD Rom to be the first boot device, and the hard drive as the 2nd. Installed my bootable CD with clarkconnect 4.0 on it, and it booted up.
Installing OS
There is a CC installation guide here
http://www.clarkconnect.com/help/pdf/CC-Quickstart.pdf
It is for the older version of CC, but basically the same.
Followed the instructions, and installed CC to the hard drive. It ends up overwriting the hard drive, so don’t have anything you want on the hard drive. First time, I decided to install everything, and the installation failed, had a problem reading the CD. Then, I tried again, this time I did not install the Email and SPAM programs (won’t use this for email), and the installation worked. I have no idea if the stuff I did not install had anything to do with the success.
Removed the CD, and PC booted from the HD now. I connected the PC to my Ethernet switch/router (I am not going to run this wireless right now, I will run a wire from the switch). My switch is a Motorola 802.11G wireless router, with 4 Ethernet port.
I let the PC come up
If you were running the older version of CC, you would see this page
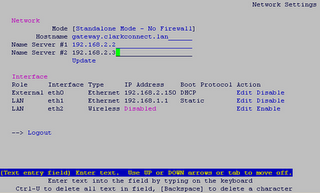
With the version 4.0, first you see a startup page, that asks what type on consule you want to bring up. I think I picked the GUI one, but I did not write down what I did, and I no longer have a monitor attached to my CC PC.
Next, I tried to talk to the CC PC from my XP PC.
You just run explorer, and type in
https://192.168.10.1:81/admin/
where 192.168.10.1 is the ip address found on you CC PC.
It did not work because I was using the DNS (Name Server) address, instead of the PC address. The PC address is the IP address under eth0, or something like that. Once I used the right address, I could talk to it no problem.
Putty
With the explorer interface, you are limited in what you can do. To cause some real damage, you need a console interface. I used putty, can be found here,
http://www.chiark.greenend.org.uk/~sgtatham/putty/
Downloaded it, and I just dragged it to my XP PC’s desktop, and double clicked it to start.
It comes up, with a box for the Host name or IP address. Just type in the IP address for your CC machine. You can save this, so you only need to do it once. Click open, and a new window will open, asking for your username. Type “root”, then the password you entered during the CC installation. Now, you have a console, where the “real” linux people live.
Slimserver Installation
Installing SlimserverIt is easy to install slimserver from putty.
Type in
rpm -Uvh http://www.slimdevices.com/downloads/SlimServer_v6.5.0/SlimServer_v6.5.0.noarch.rpm
This will load in the latest version (6.5) of slimserver. For older versions, find the address, and substitute it in.
rpm -Uvh http://www.slimdevices.com/downloads/nightly/latest/7.0/SlimServer_trunk_v2007-11-24.noarch.rpm
This will load the new version 7.0 beta of slimserver, which is supposed to sound better.
Once slimserver is installed, you can find it using your Win machine, on explorer by typing in http://192.168.10.1:9000/
note: substitute the address for your CC PC here.
This will bring up the familiar slimserver start page.
Adding another HD
I opened up my machine, and added another drive. I actually ended up swapping in a 60G drive for the small hard drive I had already set up, and added a 250G drive for the “data” drive. Since I swapped to boot drive, had to reinstall CC, which is pretty easy, especially after a few times. I probably ended up doing 4-5 installs before I was done.
Then, I tried to use “fdisk” from putty to set up the 2nd hard drive. When I rebooted my CC PC, I had screwed up the boot drive, so it would not boot up, Had to install CC again. Not sure what I did wrong.
When I reinstalled CC this time, on the partitioning screen, instead of “Use Default”, I selected “I will do my own partitioning”. After a few screens, the disk partitioning screen showed up. I picked the non manual option, where the program told you what to do, and just let it do everything.
It ended up creating a partition called /dev/mapper/VolGroup00-LogVol00 , which was almost 300G. It was the 250 gig drive, plus what I had not used from the 60G drive.
Setting up the HD.
To use my 300G partition, I needed to mount it. From the putty interface, typed “df”, and I got the following information.
Filesystem 1K-blocks Used Available Use% Mounted on
/dev/mapper/VolGroup00-LogVol00 297798360 1064600 281606416 1%
//dev/hda1 101086 8975 86892 10%
/bootnone 371156 0 371156 0% /dev/shm
Use the following to make a directory called “/mnt/hd”
mkdir /mnt/hd
Now “mount” it. You have to mount it to use it.
This command maps the directory you just made into the large data partition.
mount -t auto /dev/mapper/VolGroup00-LogVol00 /mnt/hd
Use cd to go to the new directory.
cd /mnt/hd
You need to mount if every time you use it, or automount it. I have not tried to automount it yet, that will come soon.Now, to move stuff between the XP and CC machines, download winscp. This adds a graphical interface to putty, and shows you the directory structures for both machines. Makes it easy to transfer files or directories.I am not sure if you need to set up samba to use winscp. I had already set samba up before I tried winscp. If it works, great, otherwise, the CC web interface program has some built in samba support, so you can use this to set up shares.Oh, and to turn if off, go to “system” then “tools” in the CC web program, and there is a place to turn off, or reset the CC PC.I placed my PC on top of a cabinet, in my garage, so I can’t reach the on/off switch. So, I built a little cable, cut off the connector from the HD LED, which I don’t need, and soldered a switch to it, with about 5 feet of wire added. So, I have a switch I can reach, to turn on the PC.Hope this helps someone. I am sure this is some details I left out, but this should get someone through the big steps. And, I am quite happy with the results. For the money spent, I have a pretty nice NAS, that will be easy to expand later, and seems easy to support and work on. \
Other Helpful Links
http://newbie.valar.co.uk/
http://linux-newbie.sunsite.dk/
Here is a very good link, to a page by another guy who made a cc server like I did.
http://www.ulverston.myzen.co.uk/mini-itx/index.htm
He has more information, and more details than I do.
And I am sure there are other ways to do what I did, and a linux expert will probably laugh at how I did things, but it works, and that's what matters to me Randy